The EuroLST dataset is seamless and gap-free with a temporal resolution of four records per day and enhanced spatial resolution of 250 m. This newly developed reconstruction method (Metz et al, 2014) has been applied to Europe and neighbouring countries, resulting in complete daily coverage from 2001 onwards. To our knowledge, this new reconstructed LST time series exceeds the level of detail of comparable reconstructed LST datasets by several orders of magnitude. Studies on emerging diseases, parasite risk assessment and temperature anomalies can now be performed on the continental scale, maintaining high spatial and temporal detail. In their paper, the authors provide examples for implications and applications of the new LST dataset, such as disease risk assessment, epidemiology, environmental monitoring, and temperature anomalies.

Reconstructed MODIS Land Surface Temperature Dataset, at 250m pixel resolution (click figure to enlarge):
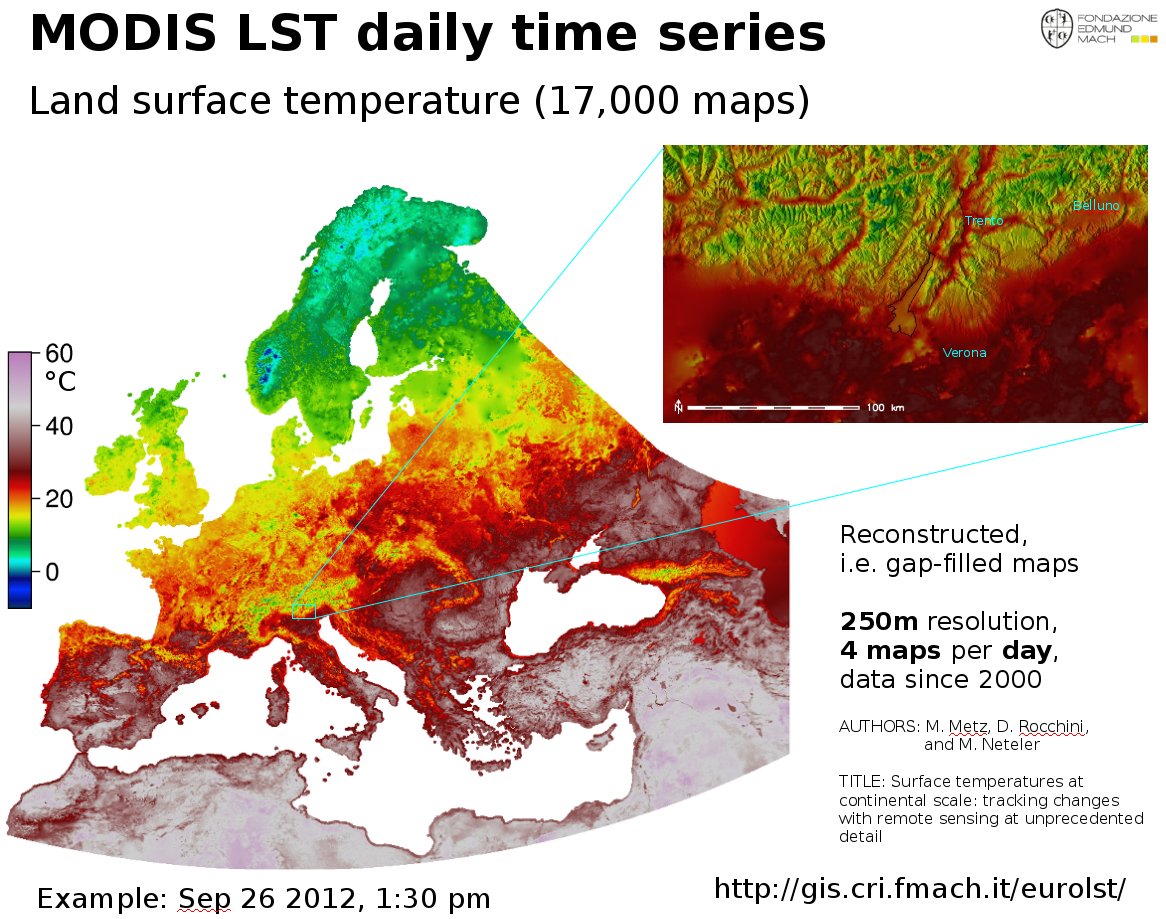
MODIS Land Surface Temperature (LST) time series reconstructed

MODIS Land Surface Temperature (LST) reconstructed (gap-filled)

Article and data citation:

EuroLST has been produced by the former PGIS group at Fondazione Edmund Mach, DBEM based on daily MODIS LST (Product of NASA) maps.

Metz, M.; Rocchini, D.; Neteler, M. 2014: Surface temperatures at the continental scale: Tracking changes with remote sensing at unprecedented detail. Remote Sensing. 2014, 6(5): 3822-3840 (DOI | HTML | PDF)

Used software

Open Source commands used in processing (GRASS GIS 7):
links to the related manual pages involved in the data preparation

  • i.pca: Principal Components Analysis (PCA) for image processing.
  • r.regression.multi: it calculates multiple linear regression from raster maps
  • v.surf.bspline: it performs bicubic or bilinear spline interpolation with Tykhonov regularization.

Furthermore:

  • r.bioclim: calculates various bioclimatic indices from monthly temperature and optional precipitation time series (install in GRASS GIS 7 with “g.extention r.bioclim”)
  • pyModis: Free and Open Source Python based library to work with MODIS data

Metadata

Map projection: EPSG 3035, prj file
PROJCS["Lambert Azimuthal Equal Area",
    GEOGCS["grs80",
        DATUM["European_Terrestrial_Reference_System_1989",
            SPHEROID["Geodetic_Reference_System_1980",6378137,298.257222101]],
        PRIMEM["Greenwich",0],
        UNIT["degree",0.0174532925199433]],
    PROJECTION["Lambert_Azimuthal_Equal_Area"],
    PARAMETER["latitude_of_center",52],
    PARAMETER["longitude_of_center",10],
    PARAMETER["false_easting",4321000],
    PARAMETER["false_northing",3210000],
    UNIT["Meter",1]]

Selected open data derived from EuroLST

BIOCLIM derived from reconstructed MODIS LST at 250m pixel resolution

BIO1: Annual mean temperature (°C*10) BIO2: Mean diurnal range (Mean monthly (max - min tem)) BIO3: Isothermality ((bio2/bio7)*100) BIO4: Temperature seasonality (standard deviation * 100) BIO5: Maximum temperature of the warmest month (°C*10) BIO6: Minimum temperature of the coldest month (°C*10) BIO7: Temperature annual range (bio5 - bio6) (°C*10) BIO10: Mean temperature of the warmest quarter (°C*10) BIO11: Mean temperature of the coldest quarter (°C*10)

BIOCLIM-like European LST maps following the “Bioclim” definition (Hutchinson et al., 2009) – derived from 10 years of reconstructed MODIS LST (download to be completed) as GeoTIFF files, 250m pixel resolution, in EU LAEA projection:

Each ZIP file contains the respective GeoTIFF file (for cell value units, see below), the color table as separate ASCII file and a README.txt with details.

WMS/WCS Server

Using this URL, you can read the EuroLST BIOCLIM data directly via OGC WMS and WCS protocol:

https://web.archive.org/web/20220615191155/https://geodati.fmach.it/production/ows_europe_lst

OpenData License

The data published in this page are open data and released under the ODbL (Open Database License).

The full EuroLST dataset is not released online as open data (size: 18TB), please ask Luca Delucchi or Roberto Zorer for more info


Acknowledgments

The MOD11A1.005, MYD11A1.005 were retrieved from the online web site, courtesy of the NASA EOSDIS Land Processes Distributed Active Archive Center (LP DAAC), USGS/Earth Resources Observation and Science (EROS) Center, Sioux Falls, South Dakota, https://e4ftl01.cr.usgs.gov/

The Orfeo ToolBox (OTB), an open-source C++ library for remote sensing images processing, is offering a wealth of algorithms to perform Image manipulation, Data pre-processing, Features extraction, Image Segmentation and Classification, Change detection, Hyperspectral processing, and SAR processing.

Since there is no (fresh) RPM package available for Centos or Scientific Linux, here some quick hints (no full tutorial, though) how to get OTB easily locally compiled. We are following the Installation Chapter.

Importantly, you need to have some libraries installed including GDAL. Be sure that it has been compiled with the “–with-rename-internal-libtiff-symbols” and ” –with-rename-internal-libgeotiff-symbols” flags to avoid namespace collision a.k.a segmentation fault of OTB as per “2.2.4 Building your own qualified Gdal“. We’ll configure and build with the GDAL-internal Tiff and Geotiff libraries that supports BigTiff files

# configure GDAL
./configure \
 --without-libtool \
 --with-geotiff=internal --with-libtiff=internal \
 --with-rename-internal-libtiff-symbols=yes \
 --with-rename-internal-libgeotiff-symbols=yes \
...
make
make install

The compilation of the OTB source code requires “cmake” and some other requirements which you can install via “yum install …”. Be sure to have the following structure for compiling OTB, i.e. store the source code in a subdirectory. The binaries will then be compiled in a “build” directory parallel to the OTB-SRC directory:

OTB-4.4.0/
|-- build/
`-- OTB-SRC/
    |-- Applications/
    |-- CMake/
    |-- CMakeFiles/
    |-- Code/
    |-- Copyright/
    |-- Examples/
    |-- Testing/
    `-- Utilities/

Now it is time to configure everything for OTB. Since I didn’t want to bother with “ccmake”, below the magic lines to compile and install OTB into its own subdirectory within /usr/local/. We’ll use as many internal libraries as possible according to the table in the installation guide. The best way is to save the following lines as a text script “cmake_otb.sh” for easier (re-)use, then run it:

#!/bin/sh

OTBVER=4.4.0
(
mkdir -p build
cd build

cmake -DCMAKE_INSTALL_PREFIX:PATH=/usr/local/otb-$OTBVER \
      -DOTB_USE_EXTERNAL_ITK=OFF -DOTB_USE_EXTERNAL_OSSIM=OFF \
      -DOTB_USE_EXTERNAL_EXPAT=OFF -DOTB_USE_EXTERNAL_BOOST=OFF \
      -DOTB_USE_EXTERNAL_TINYXML=OFF -DOTB_USE_EXTERNAL_LIBKML=OFF \
      -DOTB_USE_EXTERNAL_MUPARSER=OFF \
       ../OTB-SRC/

make -j4
# note: we assume to have write permission in /usr/local/otb-$OTBVER
make install
)

That’s it!

In order to use the freshly compiled OTB, be sure to add the new directories for the binaries and the libraries to your PATH and LD_LIBRARY_PATH variables, e.g. in $HOME/.bashrc:

export PATH=$PATH:/usr/local/bin:/usr/local/otb-4.4.0/bin
export LD_LIBRARY_PATH=/usr/local/lib:/usr/local/lib64/:/usr/local/otb-4.4.0/lib/otb/

Enjoy OTB! And thanks to the OTB developers for making it available.

The GRASS GIS Development team has announced the release of the new major version GRASS GIS 7.0.0. This version provides many new functionalities including spatio-temporal database support, image segmentation, estimation of evapotranspiration and emissivity from satellite imagery, automatic line vertex densification during reprojection, more LIDAR support and a strongly improved graphical user interface experience. GRASS GIS 7.0.0 also offers significantly improved performance for many raster and vector modules: “Many processes that would take hours now take less than a minute, even on my small laptop!” explains Markus Neteler, the coordinator of the development team composed of academics and GIS professionals from around the world. The software is available for Linux, MS-Windows, Mac OSX and other operating systems.

Detailed announcement and software download:
https://grass.osgeo.org/news/42/15/GRASS-GIS-7-0-0/

About GRASS GIS
The Geographic Resources Analysis Support System https://grass.osgeo.org/, commonly referred to as GRASS GIS, is an open source Geographic Information System providing powerful raster, vector and geospatial processing capabilities in a single integrated software suite. GRASS GIS includes tools for spatial modeling, visualization of raster and vector data, management and analysis of geospatial data, and the processing of satellite and aerial imagery. It also provides the capability to produce sophisticated presentation graphics and hardcopy maps. GRASS GIS has been translated into about twenty languages and supports a huge array of data formats. It can be used either as a stand-alone application or as backend for other software packages such as QGIS and R geostatistics. It is distributed freely under the terms of the GNU General Public License (GPL). GRASS GIS is a founding member of the Open Source Geospatial Foundation (OSGeo).

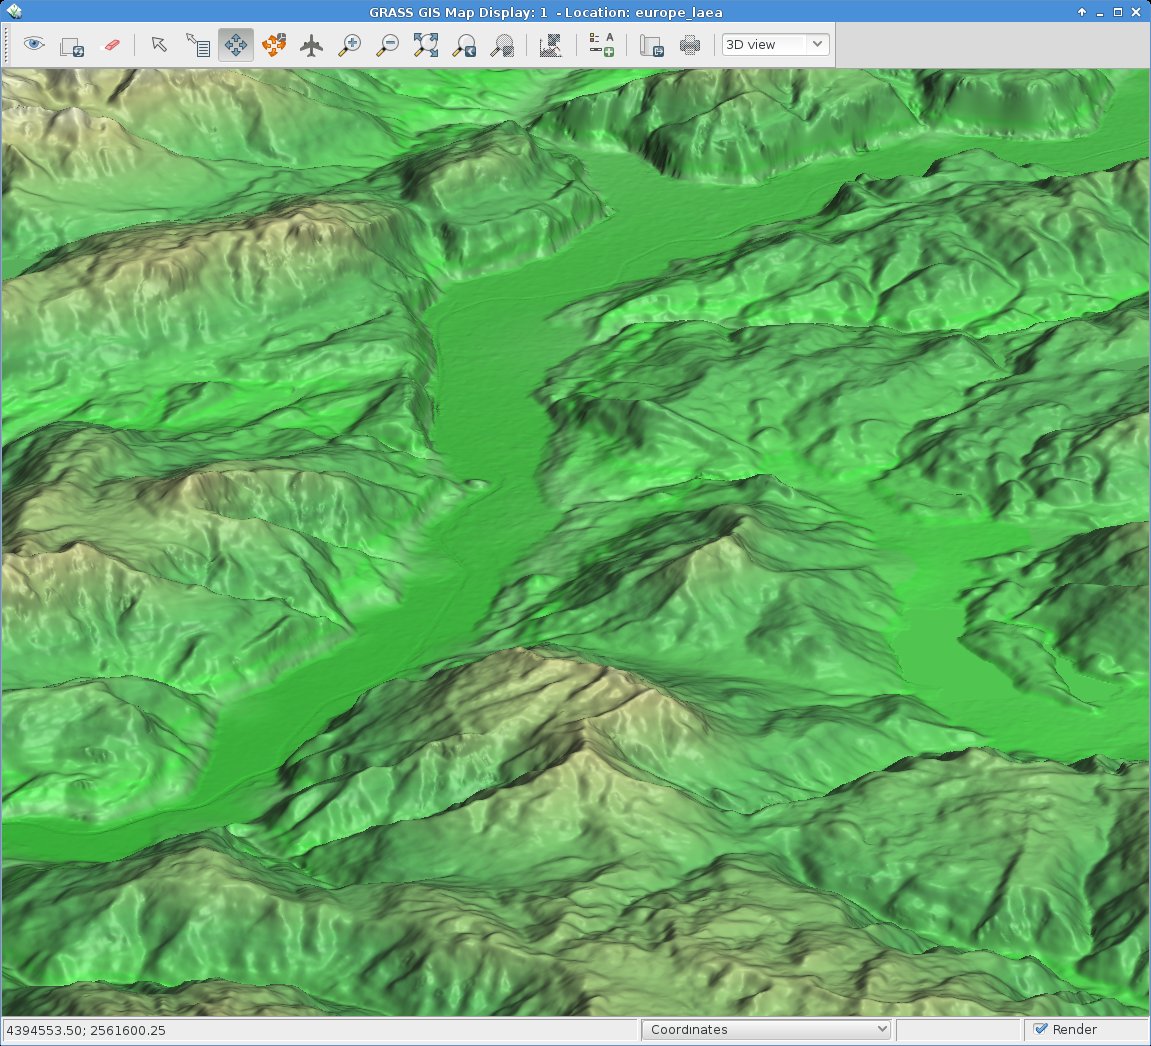
eu_dem_upper_garda_lake_riva_arco_italy

EU DEM 25m upper Garda Lake area with Riva del Garda and Arco (Italy). 3D view in wxNVIZ – GRASS GIS 7

The 25m European Digital Elevation Model (EU-DEM, Version 1) is a Digital Surface Model (DSM) representing the first surface as illuminated by the sensors:

eu_dem_s_michele_rotaliana_italy

EU DEM Rotaliana with Mezzocorona and S. Michele (Italy). Produced using Copernicus data and information funded by the European Union – EU-DEM layers.

Its elevations were captured at 1 arc second postings (2.78E-4 degrees). The tiles are provided at 25m resolution in EU-LAEA (EPSG. 3035) projection, temporal coverage: 2000, published in Oct 2013. It is a realisation of the Copernicus programme, managed by the European Commission, DG Enterprise and Industry. Metadata are provided here. According to their “Methodology” page it is a hybrid product based on SRTM and ASTER GDEM data fused by a weighted averaging approach and it has been generated as a contiguous dataset divided into 1 degree by 1 degree tiles, corresponding to the SRTM naming convention. In addition to the DEM data, a colour shaded relief image over Europe is provided.

From the metadata page: “The EU-DEM data are provided as is, i.e. without a formal validation yet. An independent statistical validation is scheduled as part of the GIO land monitoring service activities, and will be made available in the course of 2014.

Data download

Note that the GeoTIFF files are of major size, up to 5 GB:

Data import

The data come as ZIP compressed files, hence unzipping occurs (or simply use the fancy “vsizip” driver in GDAL).

Hint for GRASS GIS users: instead of importing the data, you can use the r.external command to register the GeoTIFF DEM file instead of imorting it within a EU LAEA projected location.

Enjoy!

eu_dem_trento_adige_s_michele_italy


Reading GRASS data through GDAL/OGR support

Example 1: We write out a GRASS raster map to GeoTIFF — this format
includes the coordinates within the file’s metadata:

gdal_translate -of Gtiff /usr/local/share/grassdata/spearfish/PERMANENT/cellhd/soils soilmap.tif

ogr2ogr roadsmap.shp /usr/local/share/grassdata/spearfish/PERMANENT/vector/roads/head

Fast image display with tiling
If you want fast access you might want to try converting e.g. a BIL files to a tiled TIFF, and build overviews. You can build overviews for BIL too, but it can’t be directly tiled:

# add -co “PROFILE=BASELINE” for TIF/TFW
gdal_translate source_bil global30.tif -co “TILED=YES” -co “TFW=YES” -co “PROFILE=BASELINE”
gdaladdo global30.tif 2 4 8 16

GDAL performance problem?
GDAL_CACHEMAX is normally a number of megabytes (default is 10 or so). So something like:
gdal_translate -of GTIFF -co TILED=YES –config GDAL_CACHEMAX 120 madison_1f_01.jpg madison_1f_01.tif
would use a 120MB cache.

GDAL and 1 bit maps
With a trick you can get those:
gdal_merge.py -co NBITS=1 -o dst.tif src.tif

Generate 8 bit maps for Mapserver
gdal_translate -scale in.tif out.tif
Note: As of MapServer 4.4 support has been added for classifying non-8bit raster inputs

Greyscale conversion
A “proper” conversion would involve a colorspace transformation on the RGB image into IHS or something like that, and then taking the intensity. GRASS can do things like that.

Generate an OGC WKT (SRS)
In WKT the ellipsoid is described by two parameters: the semi-major axis and the inverse flattening. For a sphere the flattening is 0 and so the inverse flattening is infinity.

# in the GDAL source code:
cd apps
make testepsg
./testepsg ‘+proj=lcc +lat_1=35 +lat_2=65 +lat_0=52 +lon_0=10 +x_0=4000000 +y_0=2800000 +ellps=GRS80 +units=m’
Validate Succeeds.
WKT[+proj=lcc +lat_1=35 +lat_2=65 +lat_0=52 +lon_0=10 +x_0=4000000 +y_0=2800000 +ellps=GRS80 +units=m] =
PROJCS[“unnamed”,
GEOGCS[“GRS 1980(IUGG, 1980)”,
DATUM[“unknown”,
SPHEROID[“GRS80”,6378137,298.257222101]],
PRIMEM[“Greenwich”,0],
UNIT[“degree”,0.0174532925199433]],
PROJECTION[“Lambert_Conformal_Conic_2SP”],
PARAMETER[“standard_parallel_1”,35],
PARAMETER[“standard_parallel_2”,65],
PARAMETER[“latitude_of_origin”,52],
PARAMETER[“central_meridian”,10],
PARAMETER[“false_easting”,4000000],
PARAMETER[“false_northing”,2800000],
UNIT[“Meter”,1]]

Simplified WKT[+proj=lcc +lat_1=35 +lat_2=65 +lat_0=52 +lon_0=10 +x_0=4000000 +y_0=2800000 +ellps=GRS80 +units=m] =
PROJCS[“unnamed”,
GEOGCS[“GRS 1980(IUGG, 1980)”,
DATUM[“unknown”,
[..]

Extracting spatial subset (subregion)
W N E S
gdal_translate -of GTiff -projwin 636861 5152686 745617 5054047.5 \
p192r28_5t19920809_nn1.tif test1_utm.tif

Fixing broken projection/datum info for raster data
gdal_translate -of HFA -a_srs epsg:32735 /cdrom/173072lsat.img \
173072lsat_fixed.img

# or, using a WKT file
gdal_translate -of HFA -a_srs file.prj /cdrom/173072lsat.img \
173072lsat_fixed.img

Merge various import maps, re-project on the fly and extract spatial subset according to current GRASS region
eval `g.region -g`
gdalwarp -te $w $s $e $n *.TIF \
srtm_cgiar3_italy_north_LL.tif

Export to (limited) TIFF readers such as ArcView, or ImageMagick
Many tools have trouble reading multi-band TIFFs with “band interleaving”, the GDAL output default. Best is to use the INTERLEAVE=PIXEL creation option. Just add to the gdal_translate command line:
-co INTERLEAVE=PIXEL

Inserting metadata (metadata tags)
gdal_translate -outsize 37.5% 37.5% \
-mo TIFFTAG_XRESOLUTION=300 -mo TIFFTAG_YRESOLUTION=300 \
in.tif out.tif

Raster map reprojection (warping)
gdalwarp -t_srs ‘+init=epsg:26591 +towgs84=-225,-65,9’ test1.tif \
test1_gb.tif

Raster map reprojection (warping) maintaining NULL values (sea etc):

gdalwarp -r bilinear -tr 1000 1000 \
-srcnodata “-32768” -dstnodata “-32768” \
-wo “INIT_DEST=-32768” \
-t_srs epsg:32632 italy_LL.tif italy_UTM32.tif

Reprojecting external map to current GRASS location externally
gdalwarp -t_srs “`g.proj -wf`” aster.tif aster_tmerc.tif

Cut out region of interest with gdalwarp (in target coords)
Add to command line (insert values instead of letters of course:
#damn order, differs from -projwin!!
-te W S E N

Merging many small adjacent DEMs into one big map (A)
This needs GDAL compiled with Python and numpy installed:
# if not installed in standard site-packages directory
export PYTHONPATH=/usr/local/lib/python2.5/site-packages
gdal_merge.py -v -o spearfishdem.tif -n “-32768” d*.tif

Merging many small adjacent DEMs into one big map (B)
Even easier, just use gdalwarp:
gdalwarp C_1mX1m/dtm*.tif big.tif
Or just a few tiles:
gdalwarp C_1mX1m/dtm0010[4-5]* big_selection.tif

Merge various map/bands into a RGB composite
gdal_merge.py -of HFA -separate band1.img band2.img band3.img -o out.img

GDAL gdalwarp interpolation comments
Which method -rn, rb, -rc or -rcs should one use for DEM and which for data like e.g. Landsat TM reprojecting?

-tps: Enable use of thin plate spline transformer based on available GCPs.
-rn: Use nearest neighbour resampling (default, fastest algorithm, worst interpolation quality).
-rb: Use bilinear resampling.
-rc: Use cubic resampling.
-rcs: Use cubic spline resampling (slowest algorithm).

FrankW suggests:
I would suggest -rb for DEMs, and one of the cubic kernels for landsat data. Of course, there are various factors that you should take into account. Using -rb (bilinear) for the DEM will perform local averaging of the nearby pixel values in the source. This give reasonable results without introducing any risky “overshoot” effects you might see with cubic that could be disturbing for analysis or visualization in a DEM. The cubic should in theory do better at preserving edges and general visual crispness than using bilinar or nearest neighbour. However, if you are wanting to do analysis with the landsat (such as multispectral classification) I would suggest just using -rn (nearest neighbour) so as to avoid causing odd effects to the spectral values.
Nobody can’t tell you what method should be used in your case. Generally speaking, in the case of upsampling spline and cubic interpolators are more suitable (-rcs and -rc). In the case of downsampling and the same resolution it is completely up to you what method looks better. Just try them all and select the one which is most appropriate for you.

Geocoding with ‘gdal_translate’
FrankW suggests:
As far as I know there is not on-screen method for doing this, but it certainly isn’t too difficult with a little bit of semi-manual work. Open two OpenEV views, one with the unreferenced image, one with the geo-reference base you want to use. Move your cursor over the non-referenced one (let’s call it image1), record (read: write down!) the pixel x,y values. Then look at the same location in image2. Write down the geocoordinate for the pixel. You should have four numbers for each location you want to pin the image to. And so on and so on. Then use gdal_translate to translate image1.tif to image1_georefd.tif but adding the -GCP parameter for each set of coordinates. Like so…

gdal_translate -gcp 1 1 500000 5000000 \
-gcp 200 400 550000 5250000 image1.tif \
image1_geo.tif

Reading HDF ASTER
gdalinfo pg-PR1B0000-2002031402_100_001

To select a channel and warp to UTM (or whatever is inside):
gdalwarp HDF4_SDS:ASTER_L1B:”pg-PR1B0000-2002031402_100_001″:2 aster_2.tif
gdalinfo aster_2.tif

I get the impression that the Web sites where Soviet Military Topographic Map Sets are collected, slowly disappear from the web. I wonder, if OSGeo.org could give these really nice maps a new home. I found some remaining material on the web:

Map coverage (latest?):
* https://replay.waybackmachine.org/20060523215417/https://library.ucsc.edu/maps/ucsmg/soviet.jpg

Some links:

Soviet Topographic Map Symbols

Edit 2015: Interesting write-up by Wired about the maps: