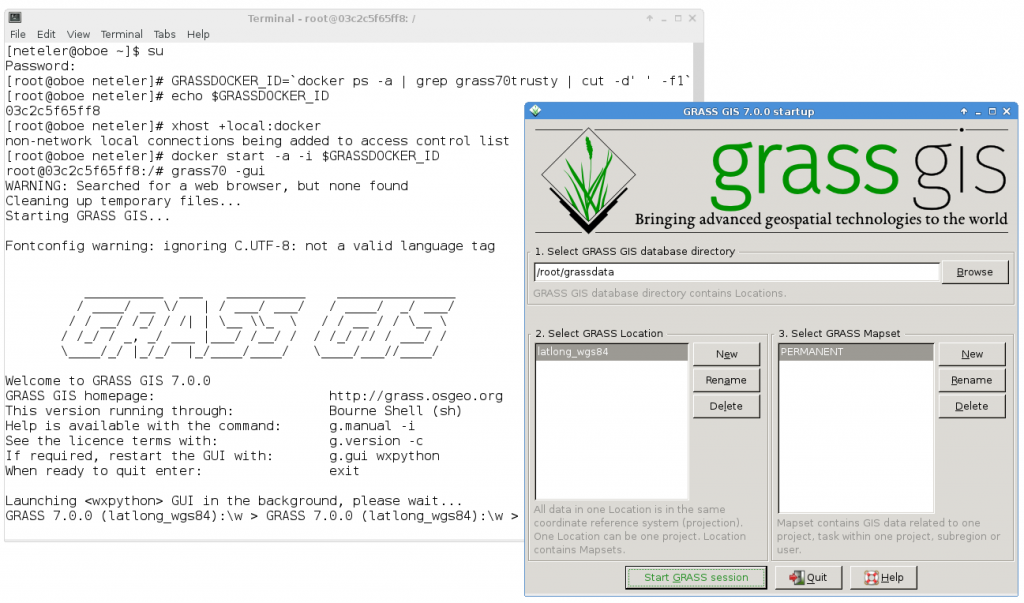
 Sometimes, we developers get reports via mailing list that this & that would not work on whatever operating system. Now what? Should we be so kind and install the operating system in question in order to reproduce the problem? Too much work… but nowadays it has become much easier to perform such tests without having the need to install a full virtual machine – thanks to docker.
Disclaimer: I don’t know much about docker yet, so take the code below with a grain of salt!
In my case I usually work on Fedora or Scientific Linux based systems. In order to quickly (i.e. roughly 10 min of automated installation on my slow laptop) try out issues of GRASS GIS 7 on e.g., Ubuntu, I can run all my tests in docker installed on my Fedora box:
# we need to run stuff as root user
su
# Fedora 21: install docker
yum -y docker-io

# Fedora 22: install docker
dnf -y install docker

# enable service
systemctl start docker
systemctl enable docker
Now we have a running docker environment. Since we want to exchange data (e.g. GIS data) with the docker container later, we prepare a shared directory beforehand:
# we'll later map /home/neteler/data/docker_tmp to /tmp within the docker container
mkdir /home/neteler/data/docker_tmp
Now we can start to install a Ubuntu docker image (may be “any” image, here we use “Ubuntu trusty” in our example). We will share the X11 display in order to be able to use the GUI as well:
# enable X11 forwarding
xhost +local:docker

# search for available docker images
docker search trusty

# fetch docker image from internet, establish shared directory and display redirect
# and launch the container along with a shell
docker run -v /data/docker_tmp:/tmp:rw -v /tmp/.X11-unix:/tmp/.X11-unix \
       -e uid=$(id -u) -e gid=$(id -g) -e DISPLAY=unix$DISPLAY \
       --name grass70trusty -i -t corbinu/docker-trusty /bin/bash
In almost no time we reach the command line of this minimalistic Ubuntu container which will carry the name “grass70trusty” in our case (btw: read more about Working with Docker Images):
root@8e0f233c3d68:/#
# now we register the Ubuntu-GIS repos and get GRASS GIS 7.0
add-apt-repository ppa:ubuntugis/ubuntugis-unstable
add-apt-repository ppa:grass/grass-stable
apt-get update
apt-get install grass7
This will take a while (the remaining 9 minutes or so of the overall 10 minutes).
Since I like cursor support on the command line, I launch (again?) the bash in the container session:
root@8e0f233c3d68:/# bash
# yes, we are in Ubuntu here
root@8e0f233c3d68:/# cat /etc/issue
Now we can start to use GRASS GIS 7, even with its graphical user interface from inside the docker container:
# create a directory for our data, it is mapped to /home/neteler/data/docker_tmp/
# on the host machine
root@8e0f233c3d68:/# mkdir /tmp/grassdata
# create a new LatLong location from EPSG code
# (or copy a location into /home/neteler/data/docker_tmp/)
root@8e0f233c3d68:/# grass70 -c epsg:4326 ~/grassdata/latlong_wgs84
# generate some data to play with
root@8e0f233c3d68:/# v.random n=30 output=random30
# start the GUI manually (since we didn't start GRASS GIS right away with it before)
root@8e0f233c3d68:/# g.gui
Indeed, the GUI comes up as expected!
To get out of the docker session:
root@8e0f233c3d68:/# exit    # leave the extra bash shell
root@8e0f233c3d68:/# exit    # leave docker session

# disable docker connections to the X server
[root@oboe neteler]# xhost -local:docker
To restart this session later again, you will call it with the name which we have earlier assigned:
[root@oboe neteler]# docker ps -a
# ... you should see "grass70trusty" in the output in the right column

# we are lazy and automate the start a bit
[root@oboe neteler]# GRASSDOCKER_ID=`docker ps -a | grep grass70trusty | cut -d' ' -f1`
[root@oboe neteler]# echo $GRASSDOCKER_ID
[root@oboe neteler]# xhost +local:docker
[root@oboe neteler]# docker start -a -i $GRASSDOCKER_ID

### ... and so on as described above.
Enjoy.


 Follow
 Follow